
This guide will only take minutes to complete, so go ahead, install SBT and follow these few steps, and see for yourself what RIoT can do for you.
You’ll learn about SBT’s giter8 templates, some basics about Akka Streams, how to create RIoT GPIO components, and how to deploy your code to a Raspberry Pi with RIoT Control.
It’s assumed you have a current JDK (8 or newer) installed, and access to a Raspberry Pi or similar device.
Install SBT
SBT isn’t your build tool of choice already? And you’re not in the mood for getting to know a new one just now? No worries, installation will only take a few clicks, and if you hate it, it won’t bother you ever again. But who knows, you might like it…
Just follow the simple installation steps for macOS, Windows, or Linux, or use your favorite package manager:
- Homebrew:
brew install sbt - Scoop:
scoop install sbt - Gentoo:
emerge dev-java/sbt - SDKMAN!:
sdk install sbt - apt-get: instructions here
- RPM: instructions here
Attention: SBT will need a JDK, not just a JRE. If you receive the error “javac: The system cannot find the file specified”, then check that the JAVA_HOME environment variable is set to the root directory of your JDK (and not that of your JRE, which doesn’t include javac).
Especially on Windows, check that your PATH environment variable is set correctly if you cannot find the sbt executable.
Create a new project from template
SBT can set up a new RIoT project for you, including some dependencies and the the build setup. To create a new project, just run:
sbt new riot-framework/streams.g8
(This may take a while if it’s SBT’s first run, as a number of libraries will have to be downloaded)
You will be prompted for a project name, which will also be the directory name (in the current working directory) under which the project will be created.
The template will prompt you whether to generate a configuration file for Ensime or Eclipse. If you use one of these, type yes at the prompt, change to the project’s directory, and run sbt eclipse to generate the eclipse project files, or sbt ensimeConfig to generate the Ensime config files.
Write your first Application
In your favorite editor or IDE, open the Application.java file in the newly created project. The following will have been created for you:
An Akka ActorSystem and Materializer, which you will use to run your streams (more on that later):
ActorSystem system = ActorSystem.create("riot-streams-demo");
Materializer mat = ActorMaterializer.create(system);
A simple Source that triggers once a second, sending a String to the stream:
Source<String, ?> tickSource = Source.tick(Duration.ZERO, Duration.ofSeconds(1), "Tick!");
A simple Sink that writes out any String it receives straight to the console:
Sink<String, ?> stdOutSink = Sink.foreach(o -> System.out.println(o));
The two are used in a stream that, when the program is executed, will link the source to the sink:
tickSource.to(stdOutSink).run(mat);
If you run the program now, it will generate a string every second, and print it out. Instead, for our first experiment, we would like to make a LED blink (this has often been described as the ‘Hello World!’ of physical computing).
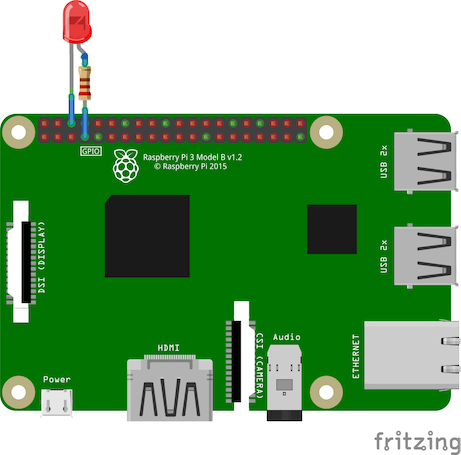
First, connect a LED and Resistor to Pin 6 and 7 on your Raspberry Pi. These can be bought online, or you can just use any regular led with a 220 Ohm in series. Finally, if you don’t have any LED handy right now, don’t worry, you can still complete this quickstart… You just won’t see anything blinking.
The shorter leg of the LED, or the pin marked ‘G’, ‘GND’ or ‘-’ if you’re using a pre-made module, goes on Pin 6, which is the Ground. The longer leg of the led goes to the resistor, and the resistor to Pin 7, which is a General-Purpose Input/Output pin, and can be switched on and off by RIoT. If you’re using a module, the other pin (or one of the other, in case of multi-colored LEDs) goes there. It’s labeled ‘+’, ‘S’, or a variety of other things :).
We’ll now want to access this pin as an Output pin in our stream: We’ll send a command to toggle it every second, and then log its state. Because it isn’t at the beginning or end of the stream, it’s not a Source or Sink, but rather a Flow, so let’s create it this way:
Flow gpio7 = GPIO.out(7).asFlow(system);
Flow steps have an input and output, which can be specified as generic parameters – always a good idea, as it’ll prevent mistakes later on. In the case of a RIoT GPIO pin, the input is a GPIO.State object, which can have the value HIGH (meaning it’s on), LOW (it’s off), or TOGGLE. The output will be another GPIO.State object, which will be either HIGH or LOW depending on the new state of the Pin:
Flow<GPIO.State, GPIO.State, ?> gpio7 = GPIO.out(7).asFlow(system);
Of course, we’ll want our LED to be switched off when our program terminates. We can specify this when creating the Flow object, and RIoT will take care of the rest when shutting down:
Flow<GPIO.State, GPIO.State, ?> gpio7 = GPIO.out(7).shuttingDownLow().asFlow(system);
Other parameters can be set in similar ways (your IDE’s code completion feature will let you browse through them), but this will do for now. Insert this before the one where the stream is defined (the one that begins with tickSource):
Flow<GPIO.State, GPIO.State, ?> gpio7 = GPIO.out(7).asFlow(system);
tickSource.to(stdOutSink).run(mat);
And insert it between the Source and the Sink:
Flow<GPIO.State, GPIO.State, ?> gpio7 = GPIO.out(7).asFlow(system);
tickSource.via(gpio7).to(stdOutSink).run(mat);
Depending on your IDE, you should immediately see an error message, because the Source is sending String objects, and our Pin is expecting GPIO.State objects. Modify the tickSource to generate a TOGGLE message:
Source<GPIO.State, ?> tickSource = Source.tick(Duration.ZERO, Duration.ofSeconds(1), GPIO.State.TOGGLE);
Also, our stdOutSink is set up to accept strings also. Modify it so that it takes GPIO.State objects:
Sink<GPIO.State, ?> stdOutSink = Sink.foreach(o -> System.out.println("LED state is " + o.toString()));
Your Application class is ready to be deployed, and should look like this:
public class Application {

    public static void main(String[] args) {
        ActorSystem system = ActorSystem.create("riot-streams-demo");
        Materializer mat = ActorMaterializer.create(system);

        // Example: This timer source sends a TOGGLE message each second:
        Source<GPIO.State, ?> tickSource = Source.tick(Duration.ZERO, Duration.ofSeconds(1), GPIO.State.TOGGLE);

        // This sink will output the values returned straight to the console:
        Sink<GPIO.State, ?> stdOutSink = Sink.foreach(o -> System.out.println("LED state is " + o.toString()));

        // This flow step sets Pin 7 to HIGH or LOW, or toggles it:
        Flow<State, State, ?> gpio7 = GPIO.out(7).shuttingDownLow().asFlow(system);

        // Streams are built by a Materializer (mat), and go from a source (via a number
        // of flow steps) to a sink:
        tickSource.via(gpio7).to(stdOutSink).run(mat);
	}

}
Test it and deploy it to your device
RIoT control will do its best to find your Raspberry Pi, ensure the needed dependencies are met, copy and install your program, and run it.
Do do this, it will need to know the host name of your Pi, and which username and password to use to log in. The defaults work if you have kept these values unchanged on your Pi. Otherwise, these can be set in the `build.sbt' file in the project root (:
riotTarget("raspberrypi", "pi", "raspberry")
Connect your raspberry pi either directly to your computer (e.g. on a spare ethernet port or a USB-to-Ethernet adapter), power it up, and run your application directly on your Pi with:
sbt riotRun
Your application will be deployed to your device, then started, and should begin outputting status messages:
[info] Deploying riot-streams-demo to raspberrypi.local
[info] To stop, press <Enter> twice.
[info] -- Logs begin at Fri 2019-09-20 23:21:10 UTC. --
[info] Sep 21 15:12:45 raspberrypi systemd[1]: Started riot-streams-demo.
[info] Sep 21 15:13:00 raspberrypi bash[4631]: LED state is HIGH
[info] Sep 21 15:13:00 raspberrypi bash[4631]: LED state is LOW
[info] Sep 21 15:13:01 raspberrypi bash[4631]: LED state is HIGH
[info] Sep 21 15:13:02 raspberrypi bash[4631]: LED state is LOW
Press [Enter] twice to exit, and your program terminates on the Pi. If you’re happy with the result, and want your program to start automatically at boot time, install it durably with:
sbt riotInstall
From now on, your application is be set-up as a service on your Pi, and will automatically restart if it crashes. Re-run the previous command if you need to update your code, or, if you’d rather deactivate it, use:
sbt riotUninstall
That’s it – You’ve just written and deployed a new service on your Raspberry Pi!
The service is named after your project, and you can control it from the Pi’s using the systemctl command.
Troubleshooting deployment issues
Problems tend to arise most often when installing prerequisite packages. This only happens during the first deployment of an Application, and may take a long time depending on the packages installed.
Out of memory when installing prerequisite packages
As the apt-get traffic is proxied through the installation tool (your Pi may not have internet access), it may run out of memory when downloading large packages (such as the Java JDK). The following error is an indication that this is happening:
[info] E: Failed to fetch http://debian.anexia.at/raspbian/raspbian/pool/main/o/openjdk-11/openjdk-11-jdk-headless_11.0.3+7-5_armhf.deb  Connection failed [IP: 127.0.0.1 8080]
[info] E: Unable to fetch some archives, maybe run apt-get update or try with --fix-missing?
If this is the case, make sure sbt has enough memory. The easiest way to do this is to add a file named .jvmopts in your project’s root directory:
-Xms1024M
-Xmx4096M
-Xss2M
-XX:MaxMetaspaceSize=1024M
Message ‘Release file … is not valid yet’
A freshly installed Pi without internet access will have a system date that is far in the past. RIoT tries to detect this and set the time to your development machine’s time, but if this fails for some reason, subsequent package installations will fail with rather confusing messages such as:
[info] E: Release file for http://raspbian.raspberrypi.org/raspbian/dists/buster/InRelease is not valid yet (invalid for another 80d 10h 26min 56s). Updates for this repository will not be applied.
In this case, make sure your Pi’s system clock is somewhat correct. It may help to wait for a while after the Raspberry Pi has booted, to allow it to synchronise to internet time sources or others.
Message ‘java.lang.NoClassDefFoundError: sun/misc/SharedSecrets’ with a Stack Trace
If you have Java 11 installed on your system, which handles access to certain classes in a more restrictive manner, you’ll see the following:
WARNING: An illegal reflective access operation has occurred
WARNING: Illegal reflective access by com.pi4j.io.file.LinuxFile (file:/usr/local/streaming-i2c-bma280/lib/com.pi4j.pi4j-core-1.2.jar) to field java.nio.Buffer.address
WARNING: Please consider reporting this to the maintainers of com.pi4j.io.file.LinuxFile
WARNING: Use --illegal-access=warn to enable warnings of further illegal reflective access operations
WARNING: All illegal access operations will be denied in a future release
Uncaught error from thread [riot-bma280-demo-akka.actor.default-dispatcher-3]: sun/misc/SharedSecrets, shutting down JVM since 'akka.jvm-exit-on-fatal-error' is enabled for ActorSystem[riot-bma280-demo]
java.lang.NoClassDefFoundError: sun/misc/SharedSecrets
	at com.pi4j.io.file.LinuxFile.getFileDescriptor(LinuxFile.java:215)
	at com.pi4j.io.file.LinuxFile.ioctl(LinuxFile.java:103)
	at com.pi4j.io.i2c.impl.I2CBusImpl.selectBusSlave(I2CBusImpl.java:291)
	at com.pi4j.io.i2c.impl.I2CBusImpl.runBusLockedDeviceAction(I2CBusImpl.java:258)
	at com.pi4j.io.i2c.impl.I2CBusImpl.writeByte(I2CBusImpl.java:185)
	at com.pi4j.io.i2c.impl.I2CDeviceImpl.write(I2CDeviceImpl.java:131)
The Pi4J library, on which RIoT builds, is currently not compatible with some newer JDKs. Until this is the case, downgrade to a more widely used version of Java, such as Java 8:
sudo apt-get -y install openjdk-8-jdk-headless
sudo apt-get -y remove openjdk-9-jre-headless openjdk-10-jre-headless openjdk-11-jre-headless
Message ‘no jimage in java.library.path’ with a Stack Trace
Parts of Akka seem to rely on classes that aren’t present in headless JREs. Install the headless JDK:
sudo apt-get -y install openjdk-8-jdk-headless